fake-ip
Mosdns + Sing-box (TPROXY 旁路由模式)
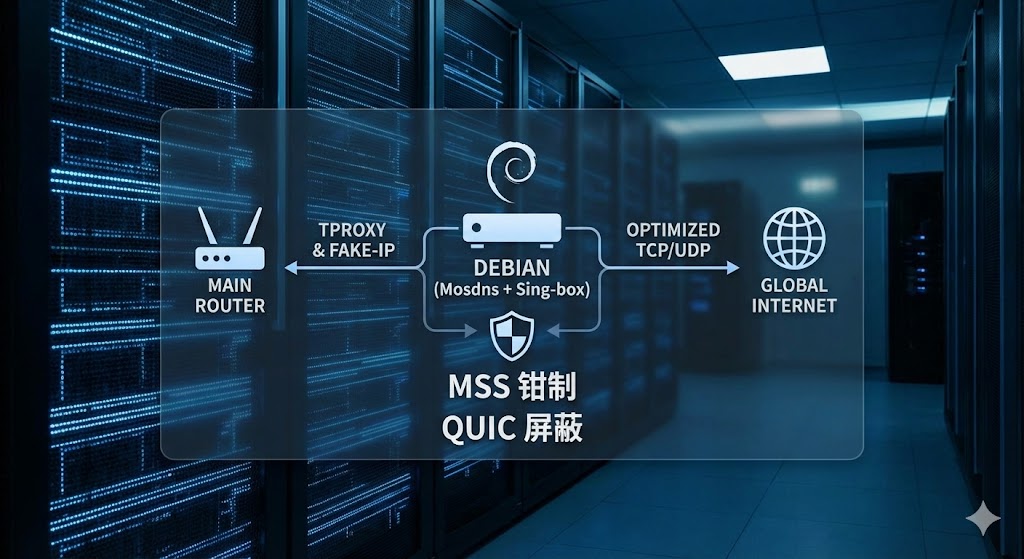
📌 架构概述
本方案采用物理主路由配合独立服务器(Mosdns 与 Sing-box 逻辑分离)的架构,结合 Fake-IP 与主路由静态路由,实现无感、高效的全局透明代理。
  graph TD
    subgraph Local_Network
        Client[终端设备]
        MainRouter[主路由 / 网关<br>静态路由: 7.0.0.0/8 指向旁路由]
        Mosdns[Mosdns 服务器]
        Singbox[Sing-box 旁路由]
        Outdns[外部DNS服务]
        ProxyNode((远端代理节点))
        DirectSite((国内直连网站))
        TargetSite((海外目标网站))
    end

    %% ----------------- DNS 解析流程 0 -----------------
    Client -. "DNS 查询请求" .-> Mosdns
    Mosdns -. "非代理域名" .-> Outdns
    Outdns -. "返回真实IP" .-> Mosdns
    Mosdns -. "代理域名" .-> Singbox
    Singbox -. "返回Fake-IP" .-> Mosdns
    Mosdns -. "1 代理域名返回Fake-IP<br>2 非代理域名返回真实IP" .-> Client

    %% ----------------- 流量转发流程 6-----------------
    Client -- "访问真实 IP<br>(国内直连)" --> MainRouter
    Client -- "访问 Fake-IP<br>(命中代理)" --> MainRouter

    MainRouter -- "常规 NAT" --> DirectSite
    MainRouter -- "命中 7.0.0.0/8 静态路由" --> Singbox

    %% ----------------- 代理处理流程 10-----------------
    Singbox -- "隧道加密流量发出<br>(带 mark 255)" --> MainRouter
    MainRouter -- "转发加密流量" --> ProxyNode
    ProxyNode -- "实际访问" --> TargetSite

    %% 样式调整
    style Singbox fill:#f9e1e1,stroke:#d9534f,stroke-width:2px
    style MainRouter fill:#e1f5fe,stroke:#5bc0de,stroke-width:2px
    style Mosdns fill:#e8f5e9,stroke:#5bc0de,stroke-width:2px
    linkStyle 7,9,10,11,12 stroke:#ff0000,stroke-width:2px,color:#ff0000
    linkStyle 6,8 stroke:#00ff00,stroke-width:2px,color:#00ff00
    linkStyle 0,1,2,3,4,5 stroke:#0000ff,stroke-width:2px,color:#0000ff
- DNS 分流:终端设备的所有 DNS 请求首先到达 Mosdns,Mosdns 进行国内外分流。国内网站直接返回真实 IP;国外网站将请求发给 Sing-box,由 Sing-box 返回一个
7.x.x.x格式的 Fake-IP 给终端。 - 主路由转发:主路由上配置了静态路由(将
7.0.0.0/8的流量全部转发给 sing-box透明代理)。当终端去访问刚才拿到的 Fake-IP 时,流量自然被送入了旁路由。 - sing-box接管流程:利用 TPROXY 完美接管这些外来流量,封装数据包,转发给外部代理服务,同时为了防止非对称路由引发的网页卡死问题,在前置阶段强行钳制了 TCP 的 MSS 大小。
1. Debian 系统网络准备
作为透明代理网关,必须开启 Linux 的 IP 转发功能。
1. 修改 sysctl 配置:
1
sudo nano /etc/sysctl.conf
2. 确保以下两行未被注释,且值为 1:
1
2
net.ipv4.ip_forward=1
net.ipv6.conf.all.forwarding=1
3. 应用生效:
1
sudo sysctl -p
1 | sudo nano /etc/sysctl.conf |
1 | net.ipv4.ip_forward=1 |
1 | sudo sysctl -p |
2. sing-box 核心配置参考
sing-box 需要配置一个 TPROXY 入站,并配置对应的路由规则。
**关键点:防止回环、屏蔽 QUIC (解决手机 App 卡顿)**。
在你的 config.json 中,确保包含以下核心逻辑:
1 | { |
outbounds需要按照自己需要进行配置
iptables 流量接管脚本
本脚本采用了标准的 TPROXY 劫持模式,并加入了针对非对称路由的 MSS 钳制。
创建脚本文件:
sudo nano /usr/local/bin/proxy.sh写入以下内容:
1
2
3
4
5
6
7
8
9
10
11
12
13
14
15
16
17
18
19
20
21
22
23
24
25
26
27
28
29
30
31
32
33
34
35
36
37
38
39
40
41
42
43
44
45
46
47
48
49
50
51
52
53
54
55
56
57
58
59
60
61
62
63
64
65
66
67
68
69
70
71
72
73
74
75
76
77
78
79
80
81
82
83
84
85
86
87
88
89
90
91
92
# ================= 核心配置变量 =================
PROXY_PORT=7890 # 必须与 sing-box 的 tproxy listen_port 保持一致
PROXY_FMARK=1 # 策略路由标记
PROXY_TABLE=100 # 专属路由表
MSS_VALUE=1350 # 【关键】钳制 MSS,彻底解决非对称路由造成的 MTU 黑洞(网页卡死)问题
# ================================================
if [ "$EUID" -ne 0 ]; then
echo "请以 root 权限运行此脚本"
exit 1
fi
start_proxy() {
echo "正在启动 Iptables TPROXY 全局转发规则..."
# 0. 修复非对称路由导致的 MTU 黑洞问题
iptables -t mangle -I PREROUTING 1 -p tcp -m tcp --tcp-flags SYN,RST SYN -j TCPMSS --set-mss $MSS_VALUE
# 1. 策略路由配置:为打上标记的流量建立独立回环通道
ip rule add fwmark $PROXY_FMARK table $PROXY_TABLE 2>/dev/null
ip route add local default dev lo table $PROXY_TABLE 2>/dev/null
# 2. Mangle 表:处理外来流量 (局域网设备 -> 旁路由)
# [DIVERT] 维护已建立连接的状态机,防止连接被意外重置
iptables -t mangle -N DIVERT
iptables -t mangle -A DIVERT -j MARK --set-mark $PROXY_FMARK
iptables -t mangle -A DIVERT -j ACCEPT
iptables -t mangle -A PREROUTING -p tcp -m socket -j DIVERT
# [SINGBOX] 处理新连接的劫持
iptables -t mangle -N SINGBOX
# 放行本地及局域网互访流量,防止内网瘫痪
for subnet in 0.0.0.0/8 10.0.0.0/8 127.0.0.0/8 169.254.0.0/16 172.16.0.0/12 192.168.0.0/16 224.0.0.0/4 240.0.0.0/4; do
iptables -t mangle -A SINGBOX -d $subnet -j RETURN
done
# 劫持剩余所有公网 TCP/UDP 流量(包含需要代理的 DNS 请求)给 Sing-box
iptables -t mangle -A SINGBOX -p tcp -j TPROXY --on-port $PROXY_PORT --tproxy-mark $PROXY_FMARK
iptables -t mangle -A SINGBOX -p udp -j TPROXY --on-port $PROXY_PORT --tproxy-mark $PROXY_FMARK
iptables -t mangle -A PREROUTING -j SINGBOX
# 3. Mangle 表:处理本机发出的流量 (Debian 自身 -> 外网)
iptables -t mangle -N SINGBOX_OUT
# 【免死金牌】放行 Sing-box 自身发出的流量 (匹配 mark 255),防止死循环
iptables -t mangle -A SINGBOX_OUT -m mark --mark 255 -j RETURN
# 放行本机发往局域网的流量
for subnet in 0.0.0.0/8 10.0.0.0/8 127.0.0.0/8 169.254.0.0/16 172.16.0.0/12 192.168.0.0/16 224.0.0.0/4 240.0.0.0/4; do
iptables -t mangle -A SINGBOX_OUT -d $subnet -j RETURN
done
# 将本机产生的其他公网流量打标,送入代理
iptables -t mangle -A SINGBOX_OUT -p tcp -j MARK --set-mark $PROXY_FMARK
iptables -t mangle -A SINGBOX_OUT -p udp -j MARK --set-mark $PROXY_FMARK
iptables -t mangle -A OUTPUT -j SINGBOX_OUT
echo "规则已应用:TPROXY 流量接管成功。"
}
stop_proxy() {
echo "正在清理 Iptables 规则..."
# 清理 MSS 钳制
iptables -t mangle -D PREROUTING -p tcp -m tcp --tcp-flags SYN,RST SYN -j TCPMSS --set-mss $MSS_VALUE 2>/dev/null
# 清理 PREROUTING 链
iptables -t mangle -D PREROUTING -p tcp -m socket -j DIVERT 2>/dev/null
iptables -t mangle -D PREROUTING -j SINGBOX 2>/dev/null
# 清理 OUTPUT 链
iptables -t mangle -D OUTPUT -j SINGBOX_OUT 2>/dev/null
# 清洗并删除自定义链
for chain in DIVERT SINGBOX SINGBOX_OUT; do
iptables -t mangle -F $chain 2>/dev/null
iptables -t mangle -X $chain 2>/dev/null
done
# 清理策略路由
ip rule del fwmark $PROXY_FMARK table $PROXY_TABLE 2>/dev/null
ip route flush table $PROXY_TABLE 2>/dev/null
echo "规则清理完毕,网络已恢复默认直连。"
}
case "$1" in
start) start_proxy ;;
stop) stop_proxy ;;
restart) stop_proxy; start_proxy ;;
*) echo "用法: $0 {start|stop|restart}"; exit 1 ;;
esac赋予执行权限并启动:
1
2
sudo chmod +x /usr/local/bin/proxy.sh
sudo /usr/local/bin/proxy.sh start
建议可以放到sing-box的service脚本里面,增加如下行
1 | ExecStartPost=+/usr/local/bin/proxy.sh start |
客户端与局域网接入
一切就绪后,在需要走代理的设备(或直接在主路由 DHCP 中设置):
**网关 (Gateway)**:指向主路由 IP(例:
192.168.2.1)。(注:由于使用了策略路由和旁路由架构,客户端网关依然保持为主路由,流量由主路由静态路由或客户端自主发起,经过旁路由清洗。)
DNS 服务器:必须指向 Mosdns服务,确保所有解析请求首先进入
mosdns。
(注:可以直接在主路由上配置DHCP,然后下发mosdns的服务地址,这样可以做到无感接入)
本博客所有文章除特别声明外,均采用 CC BY-NC-SA 4.0 许可协议。转载请注明来自 风之国度!